Wednesday, April 27, 2011

Planting Tomatoes

I planted my tomatoes in the glass house today. I grow lots of tomatoes as they are the only ones that I will eat. I'm sure that anyone who has tasted home grown tomatoes, especially organic ones, will agree that it is impossible to beat the taste.

Newly planted tomatoes
I'm only growing three types this year. Beafsteak tomatoes as they are simply unbeatable in salads or sliced in sandwiches. I'm growing some yellow ones as they add a splash of colour and what I call ordinary tomatoes - the ones that you get in the shop. I mostly freeze the latter ones to use throughout the year in sauces and soups. 

Freezing them is simple. Drop them in boiling water and bring back to the boil. By this time the skin will have started to split and peel away. Remove the tomatoes and drain in a colander. Skin them; remove the core; roughly chop and put them in a large saucepan. Bring to the boil and simmer for five minutes. I give them a blitz with a hand held blender at this stage. Then put them in convenient sized containers - I use 200 ml/ 200g containers. Cool and freeze.

In the greenhouse I plant them 45 cm apart in two staggered rows down either side of the central path. I have support wires running the length of the house and strings tied to these are placed under the root ball as I plant them. This gives a firm support and it is easy to wind the vines up them as they grow.

I plant just as the first flowers are opening having kept them on the dry side to stress them and encourage flowering. It is vital to remove side shoots that appear where the leaf meets the stem. If you don't you get a mass of stems that quickly become a jungle. As the fruit set and swell I remove the lower leaves up to the lowest truss that is starting to ripen.

Water dripper
I have an automated drip system to water the tomatoes. This has several advantages. Firstly, it means that I don't have to spend hours watering 30 tomato plants by hand. It also means that I use a lot less water as the drips place it just where it is needed. This also means that the spaces between the plants are drier and this cuts down on the number of weeds.

Thursday, April 21, 2011

Making Fresh Pasta

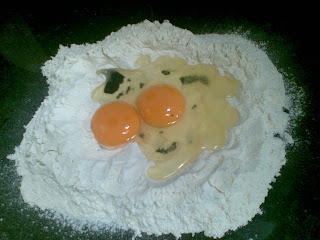
Making pasta dough
Pasta as we know it does seem to have been first made in Italy although noodles were being made in China at least 4,000 years ago. Some believe that Marco Polo first brought noodles to Italy and these developed into what we now know as pasta. What really makes pasta is the quality of the flour that is used. It needs to be really hard, high gluten flour to get the al dente texture. In Italy pasta must be made with durum wheat or durum semolina wheat. I buy special pasta flour from Italian catering shops or my local health food store that stocks excellent organic pasta flour.

Dried pasta is made from just flour and water. It is then shaped, usually mechanically although it can be done by hand, and then dried. Fresh pasta is made using egg rather than water to moisten the dough. It can also be dried but it is really at its best when made absolutely fresh and dropped into boiling water just as soon as you have finished rolling and cutting it.

Making fresh pasta can be hard work by hand and I strongly recommend getting a pasta rolling machine if you are going to make your own. I made my first pasta by hand with a rolling pin and it took hours to get it thin enough.

The ingredients are pretty simple and the way I work it out is that for each person for a main course you need

  • 1 large free range egg
  • 100g (3.5 oz) pasta flour

Pasta machine and drier
Sift your flour onto a work top. Make a well and break the eggs into it. Using a fork break up the eggs and gradually work the flour from the rim into the dough until it is combined. Then you have to knead the dough for 5 minutes. If you don't have a pasta machine you need to do this for 10 minutes. The dough will seem very hard and not very pliable. Cover it with an upturned bowl and leave to rest for 20-30 minutes. The dough will now be soft and elastic.

Now divide the dough by the number of eggs you used. If you are doing this by hand roll it with a rolling pin until you have it about 1 mm thin. If you are using a machine. Set the rollers at the widest setting. Pass the dough through once. Fold it in two and roll again. Repeat this until it has been through 10 times. Now start to narrow the roller gap one stage at a time and pass the dough through in a long strip. When you get to the narrowest setting you will have a piece of dough about a metre long.

Cut this into three lengths and pass it through the cutter blades for whatever shape you want. Hang the pasta up to dry. I have a really handy gadget for this which has 12 sticks to hang the pasta on. If you don't have one of these you can arrange broom handles suspended between chairs and any other handy surface to hang the pasta on.

Now simply drop the pasta into a large pot of salted water that is at a rolling boil. Put the lid back on immediately and bring back to the boil. Stir it and boil with the lid off for 2 to 3 minutes when the pasta should be al dente. If you have let it dry it will take longer to cook so test a piece at a time until it is just right.

Fresh pasta is best served with a wet clinging sauce rather than a lumpy one. It also turns lasagne into a whole other experience.

Wednesday, April 20, 2011

Wild Garlic - free and tasty

Wild Garlic
I remember wild garlic from my first year at school. There was loads of it growing under some trees on my way to school. All the kids used to run through it until we were reeking of garlic. I can't remember whether this annoyed the teachers or my mother but I do remember it as something I wasn't supposed to do.

I have been using it widely in the kitchen recently as we have loads of it growing all over our land. It is particularly suitable to shady places such as under trees or shrubs where it self seeds and divides itself with no effort on our behalf.

It makes an interesting addition to any salad, adding flavour and goodness. The flowers can also be added to give a bit of colour to the salad. I recently saw the flowers being deep fried and used as a garnish for a dish. I also add it to mashed potatoes giving a nice green tinge and adding bags of taste.

This evening I made a favourite dish this evening that is quick, tasty and different. When we think of pesto it is usually the pesto genovese using basil, garlic, pine nuts and olive oil. This one gets the greenness and the garlic flavour from wild garlic.

100g wild garlic leaves
50g walnut pieces
200ml extra virgin olive oil
50g parmesan or other hard grating cheese
sea salt and black pepper

Roughly chop the leaves and place these with the walnuts in a food processor. Blitz to roughly chop them and then add the olive oil. Keep processing until a smooth texture is gained. Then add the cheese, finely grated. Season with salt and pepper to taste, both the garlic and the cheese will add saltiness so be careful.

This will keep in a sealed container in the fridge for several days.

Make your pasta - either dried or if you have time make your own egg pasta (I'll blog about this another day). Drain it but leave quite a bit of water with it. Place in a bowl and spoon some of the pesto over it. For about 300g of dried pasta I used about a quarter or a third of the amount of pesto. Serve with a fresh green salad

Monday, April 11, 2011

Coping with Carrot Root Fly

Organic carrots are one of the organic movement's big selling points. They simply taste so much better than those grown with chemical fertilisers. Generally speaking they are easy to grow. You do need to keep them weed free but growing them in deep beds in rows that are 10 cm apart so that the foliage makes its own mulch sorts that problem out. The soil needs to be fertile but should not have received any manure or compost for 12 months or the roots will fork; giving interesting results that may look comical but are difficult to prepare for the kitchen. It is best to sow them thinly - and I mean thinly - aim for one seed every 2 cm or so. This cuts down on the need to thin.

The big problem I have with growing carrots is the pest carrot root fly (psila rosae). These little flies lay their eggs on the carrots and the larvae burrow into the roots making them pretty useless and inedible. The flies are difficult, if not impossible, to get rid of as you need to remove not only all carrots but also all members of the carrot (umbelliferae) from your garden and surrounds. That means parsnips, parsley, various herbs such as perennial fennel and angelica; essentially not a realistic solution.

The carrot root fly hunts initially by smell and once it is within range of the carrots it hunts by sight. It flies close to the ground - below 60 cm or so. This gives two defence strategies. The first is to confuse the smell by companion planting. You need to grow a barrier of onions or chives around your carrots. If you have a big plot of carrots it is a good idea to intersperse the carrot crops with breaks of onions. This method has met with some success although not in my garden. From what I hear it works sometimes but if some flies get in then your crop is finished. And once they are in you have got them.

The other, and I think more reliable method is to use a physical barrier. Some people erect a screen around the crop about 60 cm high. They use plastic sheeting or fine mesh. This method is actually more reliable than the companion planting method. However, it is possible for a gust of wind to blow some flies over the top and there you go again - no carrots.

After years, of poor or no crops I have resorted to completely enclosing my carrots. I have used garden fleece and enviro-mesh. These fine coverings keep the flies out but let the air and rain in. Both have been almost 100% successful. I guess there has been a hole or when I was taking a peek one of the little creatures slipped in - I don't know really. The point is it is nearly fool proof. It does have to be a complete seal and you do have to minimise lifting the covering. If you have to weed it is best to do it when it is raining as the flies go to ground and the rain keeps the smell of carrot down too.

So, if you have lost your crops to the root fly give this method a try and you can be enjoying your own buttered baby carrots, carrot salad or vichy carrots once again.

Sunday, April 10, 2011

Barbecued Potato Slices

This recipe can be varied to accompany your main dish. You can spice it up by adding chilli; make it more herby; use lemon juice or orange juice or whatever. Play around with it.

1 kg large, floury potatoes
4 tbsp olive oil
2 cloves garlic
1 tbsp lemon juice or vinegar
1 tbsp chopped fresh herbs
2 tsp paprika
sea salt
black pepper

Slice the potatoes about 5 mm thick. I use a mandoline slicer to get even slices but you can use a knife.

Crush the garlic with the salt. Do this by roughly chopping the garlic; add salt and then mash it with the flat of the blade of your knife. This releases more of the garlic flavour and because it has combined with the salt it penetrates better.

Mix the olive oil, garlic, lemon juice, herbs, paprika and black pepper in a plastic container with a sealable lid. Add the potato slices and shake well to mix the ingredients and coat the potatoes. Leave to marinade for an hour or so. Shake the container every so often.

Barbecue the slices on a hot plate until crisp and browned on both sides.

Barbecued Leg of Lamb

The swallows have just arrived from Africa and the weather has taken a turn for the warmer here for the past few days with temperatures of 18-20 C so it is time to get the barbecue out. I love barbecued food. There is something primal about it I guess going back to some distant ancestor who discovered the delight of eating a carcass that had been cooked in a brush fire.

Today, we are a bit more intentional about it and prepare our victuals and add flavour with herbs and spices. Lamb is one of the best meats for the barbecue and one that I never tire of doing in different ways. This recipe is sort of Moroccanish with yoghurt, mint, garlic and other spices. I use whole spices and grind them when I want them as the taste is simply so much better than spices bought ready ground.


3kg (7lb) leg of lamb, butterflied (see below)
25g (1oz) fresh mint
juice of 2 lemons
4 garlic cloves, finely chopped
2 tbsp coriander seeds
4 dried birds eye chilli
2 tsp cumin seed
2 tsp black pepper corns
4 tbsp extra virgin olive oil
6 tbsp Greek strained yoghurt
2 tbsp honey
salt and freshly ground black pepper

To butterfly the lamb cut down the front of the shin bone where the flesh is thinnest and continue this cut up the thigh bone. Now, using your knife, peel the flesh away from the bones. You will be left with a piece of meat that is shaped like a butterfly – hence the name. Place the lamb in a shallow non-metallic dish.

Grind the coriander, cumin, peppercorns and chilli in a spice grinder. Put the the mint in a bowl with the lemon juice, garlic, ground spices, olive oil, yoghurt and honey. Rub all over the meat, then cover with cling film and chill overnight or leave to stand at room temperature for 2-3 hours if time is short.

Light a barbecue. If the lamb has been chilled overnight, bring it back to room temperature. Salt the meat. Barbecue over medium-hot coals for about 50-60 minutes for medium rare lamb, turning occasionally. The time will depend upon the heat of the barbecue. Cover the meat with a sheet of aluminium foil while you are cooking it.

Remove the lamb from the barbecue and leave to rest in a warm place for 10 minutes. If you don’t like your lamb too pink you can cover it with foil at this point and it will continue to cook.

 As you can see in the picture I served this dish with barbecued potato slices and sliced courgette. See the recipe below.

Wednesday, April 6, 2011

Spicy Parsnip Soup

Pestle and mortar
The parsnips are just finishing now and I absolutely love this soup. It is packed with flavour - both the spices and the parsnips. Parsnips go very well with Indian spices and a variation on roast parsnips is to sprinkle them with curry powder or your own mix of spices, e.g. cumin, coriander, chilli, when you put them in the oven. Here's the recipe for the soup for now.


Ingredients
1 onion, medium finely chopped
1 garlic clove, chopped
1 parsnip, large, peeled and cut into chunks
45g Butter
1 tbsp plain flour
1 pinch salt and fresh ground black pepper
1 litre well flavoured stock - you can use any stock you like but I prefer to use vegetable
1 handful coriander, or parsley, chopped

1 tbsp coriander seeds

1 tsp cumin seeds
¼ tsp Fenugreek Seeds
½ tsp chilli flakes
1 tsp ground turmeric
Method
1. First make the spice mix by dry roasting the first three spices in a small, heavy frying pan over a moderate heat until toasted and aromatic.
2. Tip into a mortar and leave to cool, and then grind with your pestle to a powder with the chilli, then add the turmeric. You can use a spice grinder (coffee grinder kept for spice grinding).
3. Sweat the onion, garlic and parsnip gently in the butter, with the lid on the pan, for 10 minutes. Stir in the flour and a tablespoon of the spice blend, plus a little salt. Cook for 2 more minutes, stirring occasionally.
4. Pour in the stock, gradually. Bring up to the boil and simmer for about 15-20 minutes until the parsnip is very tender.
5. Liquidise the mixture, adding water or more stock if you have any to hand, until he soup has a similar consistency to double cream. Taste and correct the seasoning.
6. Reheat when needed and serve scattered with coriander or parsley.

What's this blog all about?

Spring daffodils
The idea of this blog is to record and share what I grow in the garden and what I cook in the kitchen. I'm passionate about growing, cooking and eating food. For me, all three go hand in hand. There is nothing quite like growing your own vegetables and fruit, picking them yourself, cooking them within minutes and then sitting down to enjoy their freshness and goodness.

In some ways the blog will be a diary as I will be talking about sowing and planting before I get to cooking and eating. As I have been growing this garden for over 20 years I'm going to jump right in with what is in season at them moment and also talk about what I'm currently sowing or planting or harvesting.

I'll cover techniques and tips for both gardening and cooking - eating you will have to figure out for yourself. I'll use photos and video where appropriate to illustrate what I am writing about. Recipes will be included in case you want to try them out yourself.

I have wide and varied tastes in food. I really like spicy food so Indian, Thai and Asian in general feature highly. I'm also strongly influenced by Italian food which makes such good use of fresh ingredients. I don't grow all our food - we don't currently keep any livestock so we buy in meat. Also rice and many pulses don't do too well in Ireland so we buy these. Likewise wheat doesn't do too well so flour is bought in.

In the garden I will write about the philosophy and methodology I garden by. I became an organic gardener since the mid 1970's and have been growing according to these principles since. This is my fourth garden and the biggest of the lot.

The whole plot is about 2 hectares with a large house, outhouses and a yard. On that we grow most of our own vegetables, some fruit, quite a bit of our firewood, lots of shrubs, flowers and herbs. We also have allowed about 20% of the plot to remain untouched as a wildlife reserve.

I would like this blog to be interactive so please comment - send your suggestions, ask questions.......

Happy reading, growing and eating

Friday, April 1, 2011

A mixed salad bowl

Winter Mix
One of my favourite innovations from seed companies in recent years has been the introduction of mixed packets of salad leaves. There is a great range available from most seed merchants. Some of my favourites are Spicy Mix, Italian Mix, Mixed Lettuce, Winter Mix, Oriental Mix, Stir Fry Mix.

They couldn't be simpler  to grow and they are something you can do on your windowsill or back porch. You can grow them in pots, grow bags, outdoors or under cover. I'm currently enjoying Winter Mix, Mixed Lettuce and Stir Fry Mix from the glass house.


Other salad leaves that are easy to grow under cover or in the bed are baby spinach leaves. Simply sow them pretty close; about 2-3 cm between seeds and pick them while they are young. They go really well in a salad with rocket leaves. Again these are really simple to grow indoors or out.

It is important to keep a succession of salad leaves by sowing "little and often". Just one or two short rows of about a metre every two weeks will keep you in salad leaves.

Get your potatoes early

One of the greatest pleasures of gardening is eating your first early potatoes. They are simply perfect on their own, steamed, with a bit of butter, sea salt and fresh ground black pepper. If you like you can sprinkle a bit of parsley over them. For a celebration you can have a bottle of Guinness to wash them down.

There is great competition among gardeners to see who gets the first earlies. To get the jump on other gardeners you really do have to start early and you do need some form of protection. I have grown my first earlies under low cloches, in a poly tunnel and now I use bags in the green house.

Early potatoes in bags

It is simple enough to do. Get your seed potatoes as early as possible - ideally December - and chit them (let little sprouts grow). Then place about 10 cm of  well rotted compost in the bottom of a sack, like the ones shown in the picture. Place three seed potatoes on top and cover with a further 10 cm of compost. If there is hard frost cover with fleece.

Once the shoots are about 15 cm tall add another 10 cm of compost. Repeat this until the bags are filled. If you think they need it you can give a liquid feed of worm liquid or comfrey tea. If your compost is good enough they won't need it.

You should be able to pick your first earlies - they will be pretty small towards the end of April. Simply work your hand down and feel around until you get a few. The bags will keep on cropping for several weeks and can be moved outside once the risk of frost has passed. I cover them with fleece when I put them out.